**Introduction to DHT11 Temperature and Humidity Sensor**
The DHT11 is a digital temperature and humidity sensor that provides calibrated output signals. It offers a humidity accuracy of ±5% RH and a temperature accuracy of ±2°C, with a humidity range of 20–90% RH and a temperature range of 0–50°C. This sensor combines a resistive humidity sensing element with an NTC temperature sensor, integrated with a high-performance 8-bit microcontroller. This design ensures excellent reliability, long-term stability, and fast response time. Each DHT11 is calibrated in a highly accurate humidity chamber, and the calibration data is stored in OTP memory for internal signal processing. The single-wire interface simplifies system integration, while its compact size and low power consumption make it ideal for various applications. The DHT11 comes in a 4-pin package, making it easy to connect to microcontrollers or development boards.
**DHT11 Temperature and Humidity Sensor Electrical Characteristics**
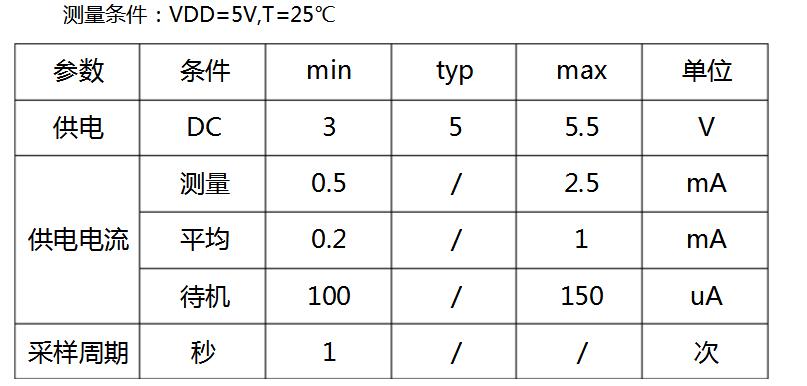
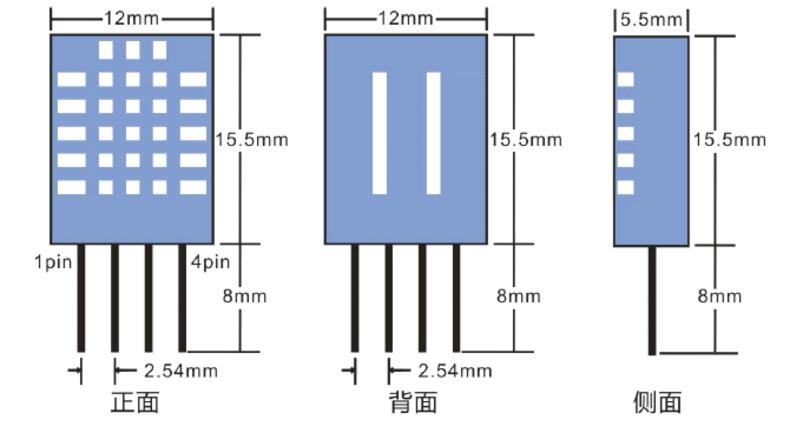
**DHT11 Package Form and Interface Description**
For short cable lengths (less than 20 meters), a 5kΩ pull-up resistor is recommended. If the cable is longer than 20 meters, adjust the pull-up resistor accordingly. If you are using a pre-made module, the resistor is already included, so no need to add it externally. Alternatively, if you're using an STC enhanced MCU, its built-in push-pull output can act as a 2kΩ pull-up resistor, but be mindful of the current limits. The maximum current from VCC and GND should not exceed 55mA to avoid overloading the microcontroller. The package dimensions and typical application circuit are shown below.
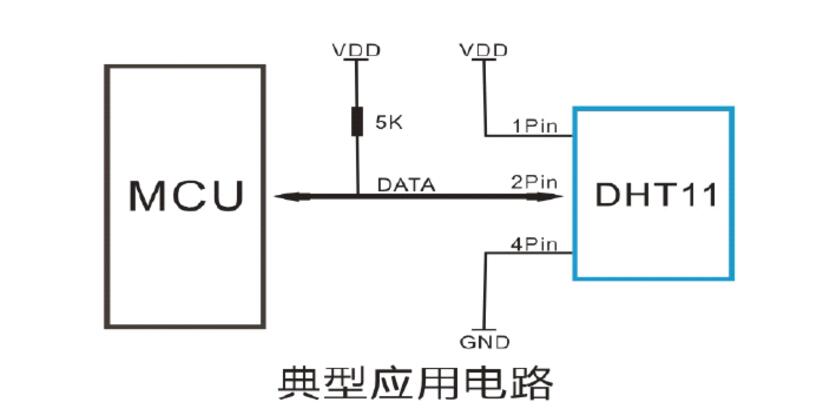
**Typical Application Circuit of DHT11**
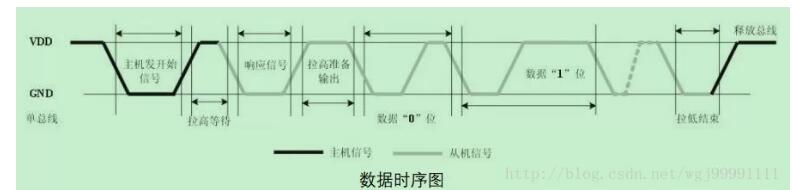
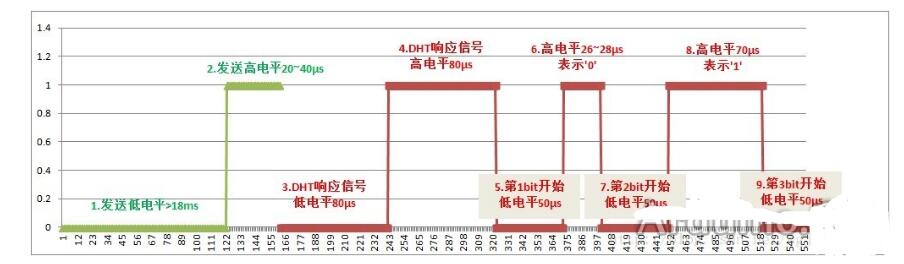
**DHT11 Timing Chart**
**DHT11 Connection Diagram**
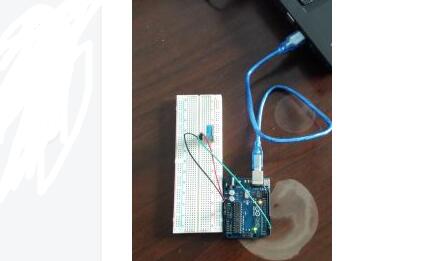
As shown in the diagram, connect the VCC pin of the DHT11 to 5V, the GND pin to ground, and the data pin to digital pin 2 on your microcontroller.
**Code Example**
```cpp
#include "dht11.h"
Dht11 DHT11;
#define DHT11PIN 2
void setup() {
Serial.begin(9600);
}
void loop() {
Serial.println("\n");
int chk = DHT11.read(DHT11PIN);
Serial.print("Read sensor: ");
switch (chk) {
case DHTLIB_OK:
Serial.println("OK");
break;
case DHTLIB_ERROR_CHECKSUM:
Serial.println("Checksum error");
break;
case DHTLIB_ERROR_TIMEOUT:
Serial.println("Timeout error");
break;
default:
Serial.println("Unknown error");
break;
}
Serial.print("Humidity (%): ");
Serial.println((float)DHT11.humidity, 2);
Serial.print("Temperature (°C): ");
Serial.println((float)DHT11.temperature, 2);
delay(2000);
}
```
**Notes on Code Usage**
1. The `#include "dht11.h"` line refers to the library file used to interface with the DHT11 sensor. To use it, follow these steps:
- Download the library from the internet (includes .h and .cpp files).
- In the Arduino IDE, go to *Sketch > Include Library > Add .ZIP Library*, and select the folder where the library is stored.
- Then include `#include "dht11.h"` in your code to use the sensor.
2. `#define DHT11PIN 2` defines the pin number used for communication. Make sure there is no semicolon after this line.
**Principle Analysis**
Understanding the pin configuration and timing diagram is crucial when working with hardware like the DHT11. Once you have the timing diagram, you can determine how to start the communication, handshake, and read the actual data. The timing diagram for the DHT11 looks like this:
**Additional Tips**
Always ensure proper power supply and stable connections. If the sensor fails to respond, check the pull-up resistor and wiring. Also, keep in mind that the DHT11 has a relatively slow update rate, so adding a delay between readings (like 2 seconds) is recommended for reliable results.
**Technology Zone**
With the rise of IoT, low-cost development systems are becoming more popular. From FPGA evaluation boards to embedded systems and industrial control boards, the demand for efficient and cost-effective solutions continues to grow. Whether you're designing a new smart water meter or integrating a CAN port into your project, the right combination of software and hardware can make all the difference.
Ground Screw Pile
Hot dip galvanized Ground Screw Pile ,Screw Pile ,Helical Screw Pile foundation materials are carbon steel Q235 (S 235 ) or Q355 ( S350) ,with hot dip galvanized finish treatment .
Helical Screw Pile ,Screw Pile ,Helix Screw Pile with one ,two three or four pieces big blade .blade diameter can be 300mm,350mm,360mm 450mm or any size as customers' design.
Screw pile foundation ,ground pile suitable for soft soil condition .
Screw Pile tube diameter : 76m,89mm,102mm,114mm,219mm.
Helical Screw Pile including Flange ground screw pile ,Flat nut ground screw pile .
Usuage : Screw Pile used in many fields ,such as Solar mounting system ,PV mounting ,fence ,housing construction ,road signs ,highway guardrail ,flagpole & .


Screw Piles ,Helical Screw Pile ,Screw Pile Foundation,Screw Pile Cost
BAODING JIMAOTONG IMPORT AND EXPORT CO., LTD , https://www.chinagroundscrew.com