
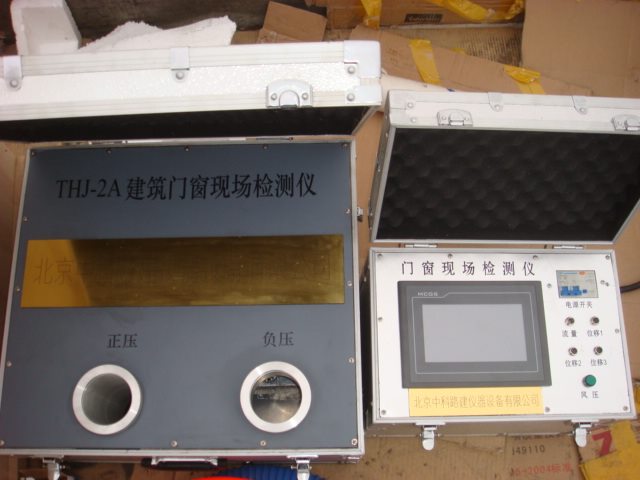
Building Door and Window Detector
Overview
The Building Door and Window Field Detector is a new portable device developed by our company. It enables manual adjustment of air pressure, displaying the instrument's cycle detection results including air pressure, airflow, and deformation displacement. The wind source and control system are integrated into a suitcase, making it compact, lightweight, durable, and easy to use.
Applicable Standards
JG/T211-2007 "On-site inspection method for airtight, watertight and wind pressure resistance of building exterior windows"
GB/T 7106, 7, 8 standard.
Main Specifications
Voltage: AC220V
Power: 7.2kW
Airtight Pressure: ±200Pa
Watertight Pressure: 0 ~ +700Pa
Wind Pressure: ±2000Pa
Airflow: 20m/s (267.8 L/hour)
Working Environment
1. Relative humidity: ≤85% with no condensation;
2. Temperature: 0 ~ 50°C;
3. Altitude: <1500 meters;
Display the correspondence between the channel number of the table and the detected amount
Channel Number | Measured
CH1 | ±200Pa pressure
CH2 | Air flow 0 ~ 267.8 L/hour (flow rate 20m/s)
CH3 | ±6000Pa pressure (Actual value = Display value ×10)
CH4, 5, 6 | Three-point displacement display, 0 ~ 20mm
Steps
1) Install the static pressure box, air path, and water system.
2) Open the suitcase and insert the straight pipe section of the wind pipe into the positive pressure port and secure it tightly.
3) Insert the air flow meter into the straight pipe section and connect its cable plug to the flow socket on the suitcase.
4) Apply plastic cloth to the outer window and insert the hose into the plastic cloth, sealing it with tape.
5) Insert the pressure tube into the controller and clamp it in the plastic cloth.
6) Close the air switch, turn on the power, and ensure the airtight light is on.
7) Adjust the “Voltage†knob counterclockwise to the minimum.
8) Press the “Airtight†or “Wind†button; if wind is insufficient, press the “Wind 2†button as well.
9) Rotate the “Voltage†knob clockwise while observing the CH1 channel pressure value reaching 150Pa (refer to the table for channel-number correspondence).
10) Press the “Wind Power 1†button.
11) When the pressure returns to zero, press “Wind Again†1, wait until 150Pa stabilizes for 3 seconds, then press “Wind Power Again†1.
12) Repeat steps 9–11, adjusting the “Voltage†knob back to minimum.
13) Press “Wind Power 1†button.
14) Slowly rotate the “Voltage†knob clockwise, watching the CH1 pressure stabilize at 100Pa for 10 seconds.
15) Continue rotating the “Voltage†knob clockwise, stabilizing at 150Pa for 10 seconds.
16) Slowly rotate the “Voltage†knob counterclockwise, stabilizing at 100Pa for 10 seconds.
17) Adjust the “Voltage†knob counterclockwise to the minimum.
18) Insert the straight pipe section of the wind path into the negative pressure port and secure it tightly.
19) Slowly rotate the “Voltage†knob clockwise, watching the CH1 pressure stabilize at -150Pa (refer to the table for channel-number correspondence).
20) Press “Wind Power 1†button.
21) When the pressure returns to zero, press “Wind Again†1, wait until -150Pa stabilizes for 3 seconds, then press “Wind Power Again†1.
22) Repeat step 19 once, adjust the “Voltage†knob counterclockwise to the minimum.
23) Press “Wind Power 1†button.
24) Slowly rotate the “Voltage†knob clockwise, watching the CH1 pressure stabilize at -100Pa for 10 seconds.
25) Continue rotating the “Voltage†knob clockwise, stabilizing at -150Pa for 10 seconds.
26) Slowly rotate the “Voltage†knob counterclockwise, stabilizing at -100Pa for 10 seconds.
27) Adjust the “Voltage†knob counterclockwise to the minimum.
28) Insert the straight pipe section of the wind path into the positive pressure port and secure it tightly.
29) Press “Wind Power 1†button.
30) Slowly rotate the “Voltage†knob clockwise, watching the CH2 pressure stabilize at 500Pa for 3 seconds, then press “Wind Again†1.
31) Repeat step 28–30, press “Wind Power 1†button.
32) Open the sprinkler system to regulate water flow at 2L/min/m² and start spraying.
33) After 5 minutes of spraying, press “Wind Again†1, slowly rotate the “Voltage†knob clockwise, watching the CH2 pressure stabilize at 100Pa for 5 minutes.
34) Continue increasing pressure gradually up to 700Pa, stabilize for 5 minutes, completing the stable pressure test.
35) Spray for 5 minutes, press “Wind Again†1, slowly rotate the “Voltage†knob clockwise, stabilizing the CH2 pressure at the design value for 15 minutes, completing the design value pressure test.
36) Adjust the “Voltage†knob counterclockwise to the minimum, press “Wind†1 button.
37) Prepare for pressurization.
38) Insert the straight pipe section of the wind pipe into the positive pressure port and secure it tightly.
39) Slowly rotate the “Voltage†knob clockwise, watching the CH2 pressure stabilize at 500Pa (refer to the table for channel-number correspondence).
40) Press “Wind Power 1†button.
41) When the pressure returns to zero, press “Wind Again†1, wait until 500Pa stabilizes for 3 seconds, then press “Wind Power Again†1.
42) Repeat step 41 once, adjust the “Voltage†knob counterclockwise to the minimum.
43) Press “Wind Power 1†button.
44) Slowly rotate the “Voltage†knob clockwise, watching the CH2 pressure stabilize at 200Pa for 10 seconds. Simultaneously record the CH4, 5, 6 displacement values and calculate deflection B ≥ 1/300.
45) Rotate the “Voltage†knob clockwise, stabilizing at 400Pa for 10 seconds. Record displacement values and calculate deflection B ≥ 1/300.
46) Slowly rotate the “Voltage†knob counterclockwise, stabilizing at 1800Pa for 10 seconds. Record displacement values and calculate deflection B ≥ 1/300.
47) Rotate the “Voltage†knob clockwise, stabilizing at 2000Pa for 10 seconds. Record displacement values and calculate deflection B ≥ 1/300.
48) Adjust the “Voltage†knob counterclockwise to the minimum.
49) Insert the straight pipe section of the wind path into the negative pressure port and secure it tightly.
50) Rotate the “Voltage†knob clockwise, watching the CH2 pressure stabilize at -500Pa (refer to the table for channel-number correspondence).
51) Press “Wind Power 1†button.
52) When the pressure returns to zero, press “Airtight†again, wait until -500Pa stabilizes for 3 seconds, then press “Airtight†again.
53) Repeat step 52 once, adjust the “Voltage†knob counterclockwise to the minimum.
54) Press “Wind Power 1†button.
55) Slowly rotate the “Voltage†knob clockwise, watching the CH2 pressure stabilize at -200Pa for 10 seconds. Record displacement values and calculate deflection B ≥ -1/300.
56) Rotate the “Voltage†knob clockwise, stabilizing at -400Pa for 10 seconds. Record displacement values and calculate deflection B ≥ -1/300.
57) Slowly rotate the “Voltage†knob counterclockwise, stabilizing at -1800Pa for 10 seconds. Record displacement values and calculate deflection B ≥ -1/300.
58) Rotate the “Voltage†knob counterclockwise, stabilizing at -2000Pa for 10 seconds. Record displacement values and calculate deflection B ≥ -1/300.
59) Adjust the “Voltage†knob counterclockwise to the minimum.
60) Adjust the “Voltage†knob counterclockwise to the minimum.
61) Press “Wind 1†and “Wind 2†buttons.
62) Turn off the air switch, turn off the power, and the power indicator goes off.
Precautions
1) Ensure the air flow meter is correctly oriented when inserted into the straight pipe section.
2) For safety, connect a reliable grounding wire to the detector at the site.
3) Convert all measurement units to those required by the standard for accurate judgment.
Switching Power Supply Transformer,High Frequency Switching Power Transformer,High Power High-frequency Transformer,Small electrical transformer
Xuzhou Jiuli Electronics Co., Ltd , https://www.xzjiulielectronic.com